Om onze Schrack Design tool nog sneller, eenvoudiger en persoonlijker te maken, hebben we een nieuwe update beschikbaar om te downloaden.
De volgende verbeteringen zijn gemaakt:
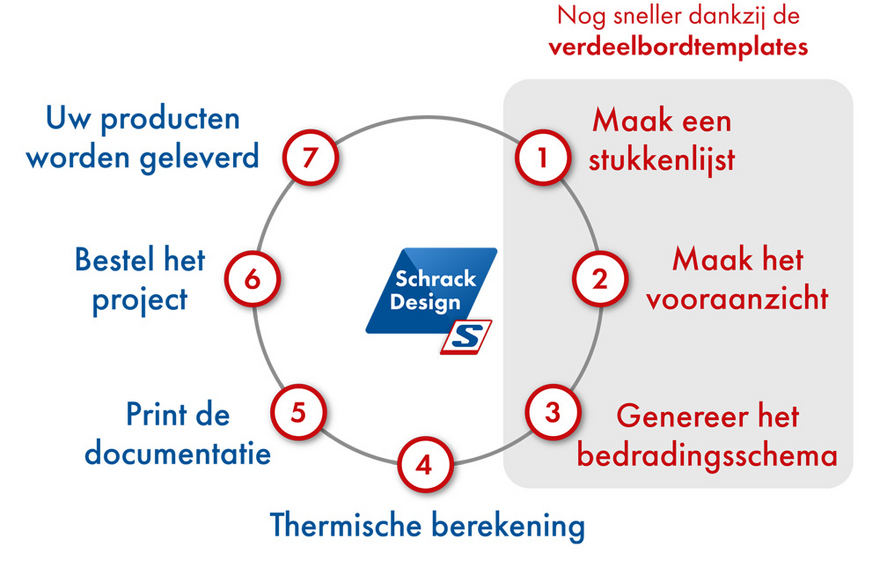
Nu met assistent: Het maken van stukkenlijsten was nog nooit zo eenvoudig
Individuele selectieopties:
Behuizingsspecificaties
Specificaties van de ruimte
Extra elektrische belastingen
Automatisch aanmaken van stukkenlijsten:
De volledige stukkenlijst wordt aangemaakt en direct aan het project toegevoegd
Thermische berekening uitschakelen:
Projecten aanmaken zonder thermische berekening
Combineer alle behuizingen, ongeacht de afmetingen
Combineer behuizingen met sjablonen
Combineer sjablonen met uw bestaande project
Efficiënt en snel: Creëer in een handomdraai grote projecten
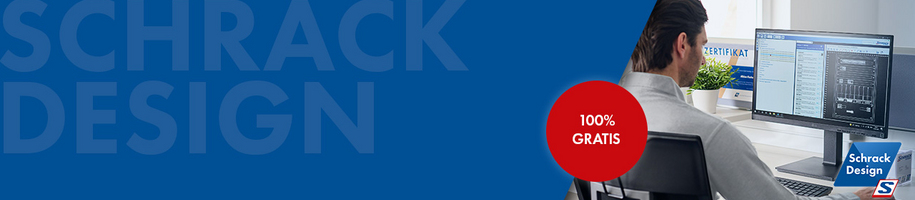
Dé tekensoftware voor elektrische verdeelborden – 100% gratis
Schrack Design, een 100% gratis tekensoftware voor elektrische verdeelborden, ondersteunt u bij de planning, ontwerp volgens de geldende norm EN61439 (tot 1600A) en documentatie van uw volgend elektrisch verdeelbord.
Schrack Design is en blijft gratis. U ontvangt het downloadbestand, komende software-updates en productupdates volledig gratis.
Klik om afbeelding te vergroten
Naast het zelf samenstellen van uw elektrisch verdeelbord vindt u in Schrack Design talloze templates van frequent voorkomende elektrische verdeelbordinstallaties terug. U kiest een template en indien gewenst past u de inhoud aan. Druk de documentatie af én u bent klaar. Uw verdeelbord bestellen? Stuur in één enkele klik uw stukkenlijst vanuit Schrack Design naar de Schrack webshop.
Klik om afbeelding te vergroten
Maak gebruik van Macro’s. Dit zijn uw artikelcombinaties die u persoonlijk kan samenstellen. U hoeft enkel de macro in uw project toe te voegen en automatisch worden alle artikelen in de stukkenlijst aangevuld.
Klik om afbeelding te vergroten
Door het aanmaken van uw stukkenlijst en uw verdeelkast krijgt u automatisch een volledige documentatie inclusief warmteberekening. En dit alles volgens de geldende norm EN 61439.
Voldoe met de automatische controle van de warmteberekening van uw elektrisch verdeelbord, volgens IEC 60890, aan de vereiste EN 61439 norm. Elk nieuw en aangepast elektrisch verdeelbord dient aan deze norm te voldoen. Hierdoor komt uw project met Schrack Design zeker aan de veilige kant te staan
De database met sjablonen voor elektrische verdeelborden maakt uw projectplanning niet alleen eenvoudiger, maar ook veel sneller. Selecteer de juiste template, bekijk de omgevingsspecificaties, druk documentatie af en plaats uw bestelling.
Uw elektrisch verdeelbord wordt op deze manier sneller gepland, gedocumenteerd en besteld dan uw koffie klaar is!
Het bedradingsschema wordt automatisch voor FI, LS en FI/LS gegenereerd. Andere artikelen kunnen eenvoudig per Drag&Drop in het eendraads- of meerdraadsschema toegevoegd en verbonden worden.
Met deze functie kunnen artikelcombinaties opgeslagen worden. Zo kan de planning van uw elektrisch verdeelbord nog sneller worden afgerond. Door zowel in het vooraanzicht als in de schakelschema’s een macro toe te voegen wordt automatisch uw stukkenlijst aangevuld.
Alle relevante gegevens, informatie over het verdeelbord, de geselecteerde producten alsook het typeplaatje worden in een normconform document verzameld die u eenvoudig kan afdrukken of digitaal kan opslaan.
Voor het ontworpen elektrisch verdeelbord in Schrack Design leveren wij alle Schrack Technik producten. Met één klik voegt u vanuit Schrack Design alle artikelen aan uw online winkelmandje. Elektrisch verdeelbord gepland. Gedocumenteerd. Besteld. Sneller dan uw koffie klaar is.
De artikeldatabase bevat meer dan 10.000 Schrack producten voor elektrische verdeelborden.
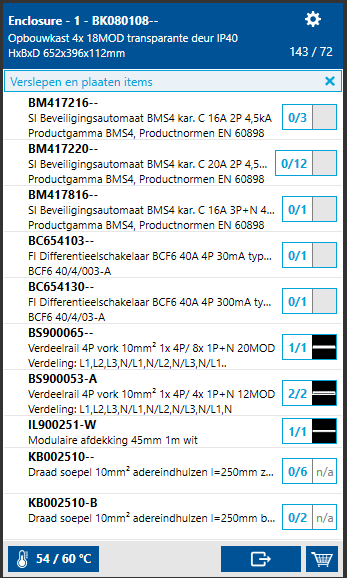
Kies uw elektrisch verdeelbord en voeg uit de database of uit uw favorieten alle andere onderdelen toe. Er is ook de mogelijkheid om eigen artikelen toe te voegen.
In de onderdelenlijst kunnen de hoeveelheden aangepast worden.
TIP! klik rechtsonder de video op instellingen - ondertiteling - automatisch vertalen - Nederlands
Met de functie stukkenlijsten plant u één of meerdere elektrische verdeelborden onafhankelijk van elkaar. Met slechts een paar klikken kan u artikelen toevoegen, vervangen, hoeveelheden wijzigen en ook vooraf geconfigureerde elektrische verdeelborden gebruiken.
Door een vooraf geconfigureerd elektrisch verdeelbord te selecteren, wordt de stukkenlijst met alle afzonderlijke artikelen automatisch weergegeven wanneer u deze invoert. Afzonderlijke artikelen uit deze lijst kan u eenvoudig vervangen of verwijderen.
Favoriete producten? Klik rechts op het geselecteerde product en kies ‘Toevoegen aan uw favorieten’. U herkent het ster-icoon ook links onder de productendatabank waar u al uw favoriete producten in kan opslaan. Voor uw volgende project staan deze favoriete producten ook snel tot uw beschikking.
Ook is het mogelijk om een CSV-bestand te importeren (zie verder). Importeren en u heeft meteen uw complete stukkenlijst in Schrack Design staan.
TIP! klik rechtsonder de video op instellingen - ondertiteling - automatisch vertalen - Nederlands
Plan het vooraanzicht van uw elektrisch verdeelbord simpelweg door de symbolen van de afzonderlijke artikelen te slepen in het tekenvenster van het bord.
Deze symbolen vindt u bij de desbetreffende artikelen in de stukkenlijst rechts naast het artikel. U kunt ook dubbelklikken op het artikel in de stukkenlijst om nog eenvoudiger de symbolen in uw vooraanzicht uit te lijnen.
Hierdoor wordt het volgende symbool naast het laatst geplaatste symbool geplaatst. Het eerste symbool dient u zelf in te stellen. Als uw gekozen elektrisch verdeelbord uit meerdere rijen bestaat, moet het eerste symbool van de volgende rij opnieuw zelf geplaatst worden.
TIP! klik rechtsonder de video op instellingen - ondertiteling - automatisch vertalen - Nederlands
Een automatische warmteberekening controleert voor u of uw elektrisch verdeelbord normconform samengesteld is
3 stappen:
In de eerste stap kan u beïnvloedende factoren zoals omgevingstemperatuur, type installatie en reductiefactor aanpassen. Belangrijk is natuurlijk dat deze waarden op basis van de werkelijke omstandigheden ingevoerd worden. Het vervangen van het verdeelbord door een grotere versie is in deze eerste stap ook mogelijk.
In de tweede stap kan u een railstel toevoegen of de lengte van bestaande railstellen aanpassen.
In de derde stap wordt, indien nodig, automatisch een passende ventilatie aangeboden om de temperatuur opnieuw in het normconforme bereik te brengen.
Klik om te vergroten
Maak een ééndraads- of meerdraadsschema van uw elektrisch verdeelbord. Net als bij het vooraanzicht sleept u eenvoudig de symbolen van uw artikelen naar het tekenvenster.
Verschillende extra functies maken een professionele bewerking mogelijk. Zo kan u bijvoorbeeld een tekst aan een kring toevoegen. Deze wordt dan ook automatisch in de documentatie (kringgegevens) opgenomen.
Ook is het mogelijk om verdelingen te koppelen, waardoor grotere projecten gerealiseerd kunnen worden. Om kruisende lijnen te voorkomen kunnen alle symbolen individueel bewerkt en verplaatst worden.
TIP! klik rechtsonder de video op instellingen - ondertiteling - automatisch vertalen - Nederlands
In 2 klikken kunt u het rapport IEC 890+A1 afdrukken. In dit rapport vindt u het vooraanzicht, schakelschema (ééndraads en meerdraads), stukkenlijst, conformiteitsverklaring en de warmteberekening volgens IEC 890 +A1.
Als laatste krijgt u het typeplaatje met alle nodige gegevens uit de documentatie. Dit kunt u uitprinten en in uw elektrisch verdeelbord kleven.
TIP! klik rechtsonder de video op instellingen - ondertiteling - automatisch vertalen - Nederlands
Zodra het ontwerp van uw elektrisch verdeelbord normconform en klaar is, kan u alle Schrack producten in de online shop bestellen.
Met een klik op de winkelwagen wordt de stukkenlijst van uw project toegevoegd aan uw persoonlijke Schrack Technik winkelwagen.
In de webshop kan u achteraf alle artikelen en aantallen controleren en indien nodig aanpassen.
Er ontbreekt enkel nog één klik om uw elektrisch verdeelbord te bestellen.
Trainingen en tutorials
Vanaf heden kan u onze Schrack Design training videos ook in het Nederlands bekijken! Via onderstaande link kan u handige video's bekijken die u tips & tricks zullen aanleren om vlotter met Schrack Design te werken.
Schrack Design Tutorialvideo's
Heel snel en eenvoudig uiteengezet: Schrack Design tutorials over verschillende thema's rond de tekensoftware Schrack Design.
Aan elk item kan u een opmerking toevoegen door in de tekeningweergave (vooraanzicht, eendraads- of meerdraadsschema) op het item te dubbelklikken. Rechts klikken op het item en dan ‘Toon productdetails’ kan ook.
Dit opent het eigenschappenvenster van het aangeklikte item. Vul het veld ‘Opmerkingen’ in. Deze ‘opmerkingen’ worden automatisch in de documentatie weergegeven.
Ofwel, u klikt bij temperatuur (onderaan de stukkenlijst), dubbelcheck je alle details van uw elektrisch verdeelbord en klikt u vervolgens op afdrukken.
Ofwel, u gebruikt het icoontje ‘afdrukken’ linksboven in het menu van Schrack Design.
Ja, u kan een stukkenlijst in .csv-formaat in Schrack Design importeren. De volgende informatie is vereist in Excel: artikelnummer, hoeveelheid, opmerking.
Wanneer u uw stukkenlijst in Excel aanmaakt, moet deze als .csv-formaat worden opgeslagen.
Om uw stukkenlijst in Schrack Design te importeren klikt u op ‘Producten’ --> ‘Inladen csv’.
TIP: Op de Schrack webshop kan u uw gevulde winkelwagen, uw offerte, uw stukkenlijsten,… als .csv downloaden!
Ondersteuning nodig?
Voor gedetailleerde vragen en ondersteuning betreffende Schrack Design software kan u steeds contact met ons opnemen.
Wij zullen uw verzoek zo snel mogelijk verwerken en nemen contact op met u!